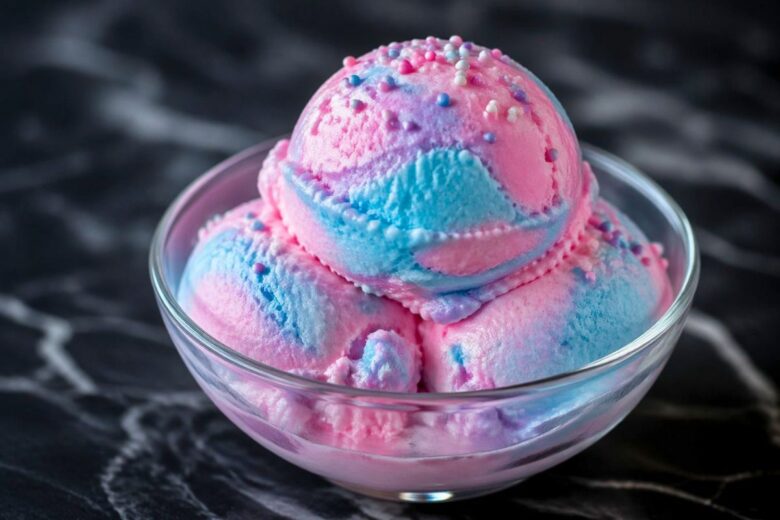
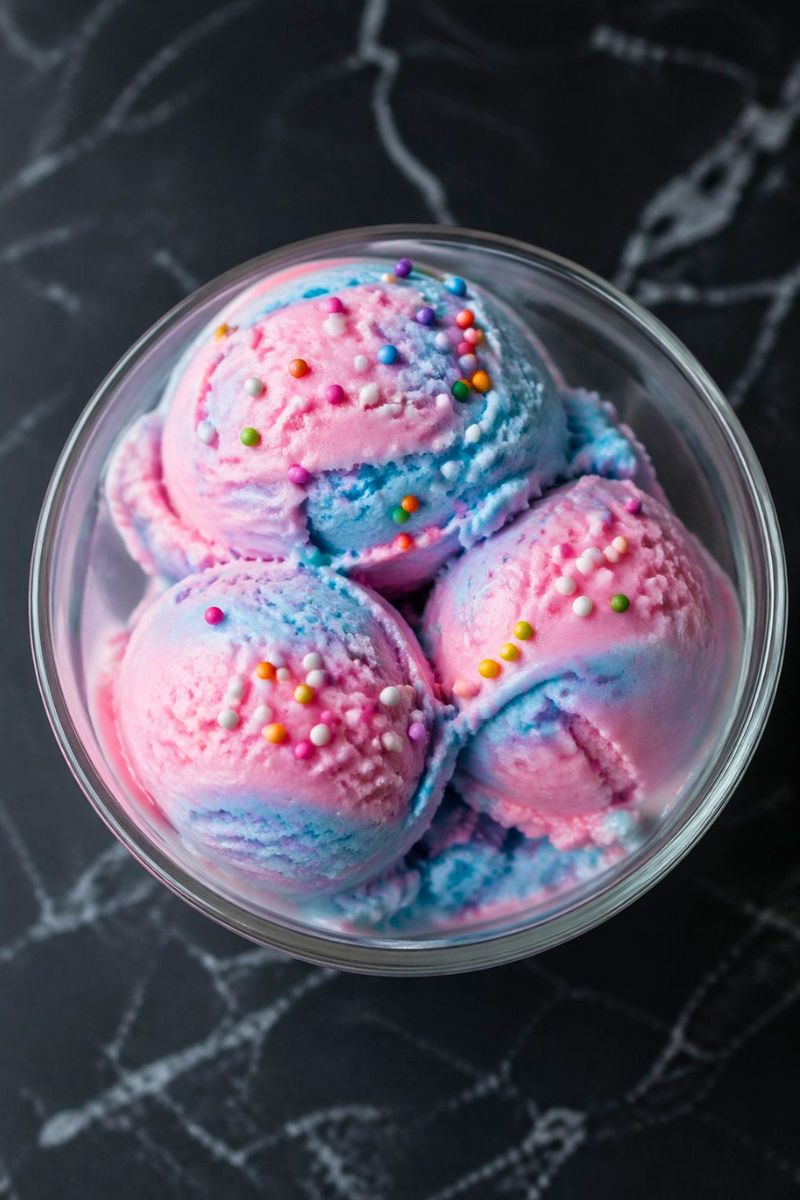
This Ninja Creami Cotton Candy Ice Cream Recipe is colorful, creamy and full of sweet fun flavor. It tastes like a carnival treat but made at home. The texture is smooth and soft, with a light cotton candy taste.
This Ninja Creami Cotton Candy Ice Cream Recipe is easy and perfect for beginners. The Ingredients for Ninja Creami Cotton Candy Ice Cream are simple and easy to find.
You will also learn How to make Ninja Creami Cotton Candy Ice Cream step by step in very easy English.
My Favorite Memory With This Recipe
I remember going to fairs as a kid and eating pink cotton candy. It melted fast but tasted magical.When I made this ice cream at home, it felt like those happy days again.
My family loved the bright color and sweet taste. It became a fun dessert we enjoy together.
Equipment List
- Ninja Creami machine
- Mixing bowl
- Whisk
- Measuring cups and spoons
- Freezer-safe container
- Spoon or spatula
Recipe Quick Overview
- Recipe Name: Ninja Creami Cotton Candy Ice Cream Recipe
- Servings: 4
- Prep Time: 10 minutes
- Cook Time: 0 minutes
- Total Time: 24 hours (including freezing)
- Course: Dessert
- Cuisine: American
- Calories: 250 kcal per serving
Ingredients You Need for Ninja Creami Cotton Candy Ice Cream
- 2 cups whole milk
- 1/2 cup heavy cream
- 1/3 cup sugar
- 1 teaspoon cotton candy flavoring
- 2–3 drops pink or blue food coloring
- 1/2 teaspoon vanilla extract
- 2 tablespoons sweetened condensed milk
Easy Step-by-Step Instructions for Ninja Creami Cotton Candy Ice Cream
1. Prepare the Base Mixture
Take a mixing bowl and add milk, cream, and sugar. Whisk until sugar dissolves completely. This creates a smooth base for your ice cream and helps give it a creamy texture later.
2. Add Flavoring
Pour in cotton candy flavoring and vanilla extract. Mix gently so the flavor spreads evenly. This step gives the ice cream its sweet and fun cotton candy taste.
3. Add Color
Add a few drops of food coloring. Stir slowly to create a soft pastel color. You can swirl pink and blue for a beautiful and playful look.
4. Freeze the Mixture
Pour the mixture into a freezer-safe container. Cover it tightly and freeze for 12–24 hours. Make sure it is completely solid before using the machine.
5. Process in Ninja Creami
Take the frozen base and place it in the Ninja Creami machine. Select the “Ice Cream” setting. The machine will turn the frozen block into creamy ice cream.
6. Re-spin if Needed
If the ice cream looks dry or crumbly, use the re-spin function. This makes the texture smoother and creamier, just like store-bought ice cream.
7. Add Mix-ins
If you like, add sprinkles or small candies. Use the mix-in function to blend them evenly into the ice cream.
8. Serve and Enjoy
Scoop into bowls and serve immediately. Enjoy the soft, creamy texture and sweet cotton candy flavor with family and friends.
Helpful Tips and Easy Variations
- Use low-fat milk for lighter version
- Add rainbow sprinkles for fun texture
- Try blue and pink swirl for visual appeal
- Use natural food coloring if preferred
- Adjust sugar level to your taste
- Freeze fully before processing
Interesting History and Fun Facts About Ninja Creami Cotton Candy Ice Cream
Cotton candy was first made in the late 1800s. It became popular at fairs and carnivals because of its light and fluffy texture.
Ice cream makers later used this flavor in frozen desserts. With machines like Ninja Creami, people can now make fun flavors easily at home.
Best Side Dishes and Pairings
This ice cream goes well with waffles or pancakes. It also tastes great with cookies or brownies.
Fresh fruits like strawberries can balance the sweetness. Chocolate syrup or caramel drizzle also works well.
Best Occasions to Serve
This recipe is perfect for summer days and hot weather. It is also great for birthday parties and kids’ events.
You can serve it during movie nights or weekend treats. It always brings fun and color to the table.
Best Ways to Store and Warm Up Tips
- Store in airtight container
- Keep in freezer for up to 1 week
- Let sit 5 minutes before scooping
- Re-spin if it becomes too hard
- Keep lid tightly closed
- Avoid repeated thawing
Nutrition Facts
| Nutrient | Amount per Serving |
|---|---|
| Calories | 250 kcal |
| Protein | 4 g |
| Carbohydrates | 30 g |
| Fat | 12 g |
| Sugar | 22 g |
| Fiber | 0 g |
Is It Good or Bad for Your Health?
This ice cream is a sweet dessert, so it should be eaten in moderation. It contains sugar and cream, which add calories.
However, it can bring joy and fun to your meals. You can make it lighter by using low-fat milk. It is best enjoyed as an occasional treat.

Ninja Creami Cotton Candy Ice Cream Recipe
Ingredients
- 2 cups whole milk
- 1/2 cup heavy cream
- 1/3 cup sugar
- 1 teaspoon cotton candy flavoring
- 2 –3 drops pink or blue food coloring
- 1/2 teaspoon vanilla extract
- 2 tablespoons sweetened condensed milk
Instructions
Prepare the Base Mixture
- Take a mixing bowl and add milk, cream, and sugar. Whisk until sugar dissolves completely. This creates a smooth base for your ice cream and helps give it a creamy texture later.
Add Flavoring
- Pour in cotton candy flavoring and vanilla extract. Mix gently so the flavor spreads evenly. This step gives the ice cream its sweet and fun cotton candy taste.
Add Color
- Add a few drops of food coloring. Stir slowly to create a soft pastel color. You can swirl pink and blue for a beautiful and playful look.
Freeze the Mixture
- Pour the mixture into a freezer-safe container. Cover it tightly and freeze for 12–24 hours. Make sure it is completely solid before using the machine.
Process in Ninja Creami
- Take the frozen base and place it in the Ninja Creami machine. Select the “Ice Cream” setting. The machine will turn the frozen block into creamy ice cream.
Re-spin if Needed
- If the ice cream looks dry or crumbly, use the re-spin function. This makes the texture smoother and creamier, just like store-bought ice cream.
Add Mix-ins
- If you like, add sprinkles or small candies. Use the mix-in function to blend them evenly into the ice cream.
Serve and Enjoy
- Scoop into bowls and serve immediately. Enjoy the soft, creamy texture and sweet cotton candy flavor with family and friends.
Notes
- Use low-fat milk for lighter version
- Add rainbow sprinkles for fun texture
- Try blue and pink swirl for visual appeal
- Use natural food coloring if preferred
- Adjust sugar level to your taste
- Freeze fully before processing
People Also Ask About Ninja Creami Cotton Candy Ice Cream
Can I make this without a Ninja Creami machine?
You can try freezing and blending, but the texture may not be as creamy. The machine gives the best result.
What does cotton candy ice cream taste like?
It tastes sweet, light, and slightly like vanilla. It reminds many people of carnival treats.
Can I use natural flavors instead?
Yes, you can use natural flavoring. It may give a softer taste but still delicious.
Why is my ice cream crumbly?
It may be too frozen. Use the re-spin function to make it smooth again.
Can I make it dairy-free?
Yes, you can use plant-based milk and cream alternatives. It will still taste good and creamy.
My Final Take
This Ninja Creami Cotton Candy Ice Cream Recipe is fun, colorful and easy to make. It brings sweet memories into your kitchen.
The Ingredients for Ninja Creami Cotton Candy Ice Cream are simple and the steps are very easy. If you are learning How to make Ninja Creami Cotton Candy Ice Cream, this guide will help you step by step.
It is a joyful dessert for kids and adults. Once you try it, it will become your favorite treat for special moments and happy days.

Millie Rose is a passionate home cook and food blogger. She loves creating simple, easy-to-follow recipes for everyday cooking. Her goal is to make home cooking fun, quick and delicious for everyone.